


Your home should feel like a tiny world waiting to be built, much like the imaginative landscapes you create with Scene Stickers or 3D Scene Stickers. While you might think a stunning kitchen or bathroom requires a dusty, expensive renovation, the secret to an elevated look is actually found in a quiet, creative ritual. Learning how to apply tile stickers is a bit like solving a beautiful puzzle; it's a chance to slow down and create a cute little escape from the oh-so-serious world. Just as you might layer journaling stickers to tell a story on paper, placing these tiles allows you to watch a scene come alive in your physical sanctuary.
We understand the hesitation that comes with new DIY projects. You don't want to deal with misaligned patterns, trapped air bubbles, or stickers that peel away when things get steamy. You want a transformation that looks professional and stays put without harming the original tiles underneath. This guide promises to help you master the art of the perfect application for a flawless, renter-friendly finish that feels like a boutique hotel upgrade.
We will explore everything from deep-cleaning your canvas to the "Hinge Method" for perfect alignment and the final trimming for a sophisticated edge. By the end, you'll have the confidence to build your little pocket of calm, one beautiful tile at a time.
Key Takeaways
- Discover why learning how to apply tile stickers is a calming, screen-free ritual that transforms your home into a tiny world of your own making.
- Master the essential cleaning steps to ensure your "stiker aesthetic" stays perfectly bonded against the humidity and kitchen grease of Singapore and Malaysia.
- Learn the clever "Hinge Method" to achieve flawless alignment without the stress of misaligned patterns or early adhesive mistakes.
- Unlock professional finishing secrets, including the sharp-blade "X-cut" technique for navigating neatly around electrical outlets and switches.
- Protect your creative masterpiece with gentle maintenance tips that keep your tiles looking sophisticated and fresh without using harsh chemicals.
The Zen of the Refresh: Why Learning How to Apply Tile Stickers is Your New Favourite Ritual
Your home is more than just a place to sleep; it is a canvas for your imagination and a tiny world waiting to be built. When you decide to learn how to apply tile stickers, you aren't just covering up an old, dated surface. You are engaging in a meditative, puzzle-like creative ritual that turns a boring afternoon into a restorative "me-time" session. In a world of endless scrolling and digital noise, this tactile task offers a rare screen-free moment to focus on the small, beautiful details of your surroundings. It is a cute little escape from the oh-so-serious world that rewards you with a tangible, aesthetic result you can see and touch every single day.
The transition from a "renter-drab" space to a personalized sanctuary is incredibly satisfying. Instead of the stress and dust of a traditional renovation, you get the gentle, rhythmic process of peeling and placing. There is a specific kind of magic in watching a scene come alive as you layer your personality onto your walls. This mindful approach to home improvement ensures that your kitchen or bathroom becomes your little pocket of calm, reflecting your unique style and providing a much-needed boost to your daily mood and inspiration.
Choosing Your Vibe: From Minimalist White to Bold Patterns
Selecting your pattern is where the miniature world-building magic truly begins. You should pick a style that complements your existing decor while pushing your creative boundaries. Are you dreaming of the serene, airy feel of a white peel and stick backsplash, or do you want to make a statement with bold, geometric "stiker aesthetic" choices? Minimalist designs can make a compact Singaporean apartment feel expansive and light; meanwhile, vibrant Moroccan-inspired patterns can turn a dull laundry area into an energizing corner of your home. The emotional impact of these patterns is real, so choose the one that makes your heart happy every time you walk into the room.
The Renter-Friendly Advantage
For many apartment dwellers across Malaysia and Indonesia, permanent changes simply aren't an option. This is why self-adhesive solutions are the ultimate project for those who love to experiment without the commitment. These stickers utilize a sophisticated Pressure-sensitive adhesive that provides a strong, reliable bond while remaining kind to the original tiles underneath. You get total peace of mind knowing that you can achieve a professional look today and still handle removing stickers from walls cleanly when it is time for your next big move. It is the perfect way to master how to apply tile stickers while keeping your security deposit safe and your creative spirit free.
Preparing Your Canvas: The Secret to Long-Lasting Adhesion
Think of your existing tiles as the base of a beautiful scene sticker book. Before you begin the joyful process of building your miniature world, you need a pristine surface. Cleaning isn't just a chore; it is the essential preparation of your sanctuary. In Singapore and Malaysia, our love for vibrant, aromatic cooking often leaves a fine, invisible layer of oil on kitchen walls. This "grease factor" is the biggest enemy of a successful refresh. If you want to master how to apply tile stickers, you must first strip away these barriers to ensure a bond that stays strong for years to come. A professional finish is 90% preparation, and taking the time to prep now ensures your creative work remains a pocket of calm rather than a source of frustration.
The Deep Clean: Removing the Invisible Barriers
Reach for a heavy-duty degreaser or traditional sugar soap rather than your standard dish detergent. Many modern dish soaps contain "moisturizing" agents designed to keep your hands soft, but these leave a microscopic residue that prevents the adhesive from grabbing hold. You want a surface that feels "squeaky" to the touch. For bathrooms, ensure the room is completely free of steam and that you've wiped away any lingering soap scum. Humidity is a silent saboteur in our tropical climate. A bone-dry tile is essential before that first satisfying peel. Following these tips for a professional look ensures your stickers won't start curling at the edges after a few weeks of humid weather.
Grout Prep and Minor Repairs
Don't ignore the lines between the tiles. A fresh-looking grout line elevates the entire "stiker pemandangan" look, making the transformation feel seamless and high-end. Use a stiff brush to scrub away any mildew or deep-seated dust. If your grout is permanently stained, a quick pass with a grout pen can work wonders before you start layering your designs. It's much easier to brighten those lines now than to wish you had later. If you find a chipped or broken tile, a tiny bit of filler will create the smooth foundation needed for a perfect finish. Once your canvas is ready and dry, you can explore our latest Wall Stickers to find the perfect match for your home's new vibe. Taking these small steps makes the actual application feel like a relaxing, "puzzle-like" ritual where everything just clicks into place perfectly.
A Step-by-Step Guide to Flawless Tile Sticker Application
Now that your surface is prepped, it's time for the most rewarding part of this creative ritual. Learning how to apply tile stickers feels like watching a scene come alive in a Scene Sticker Book. Start your journey in the most visible corner of the room to build immediate momentum. This ensures your most prominent tiles are applied with fresh energy, much like placing the central piece of a 3D Scene Sticker layout. Beginning where your eyes naturally land helps you stay inspired as you build your tiny world.
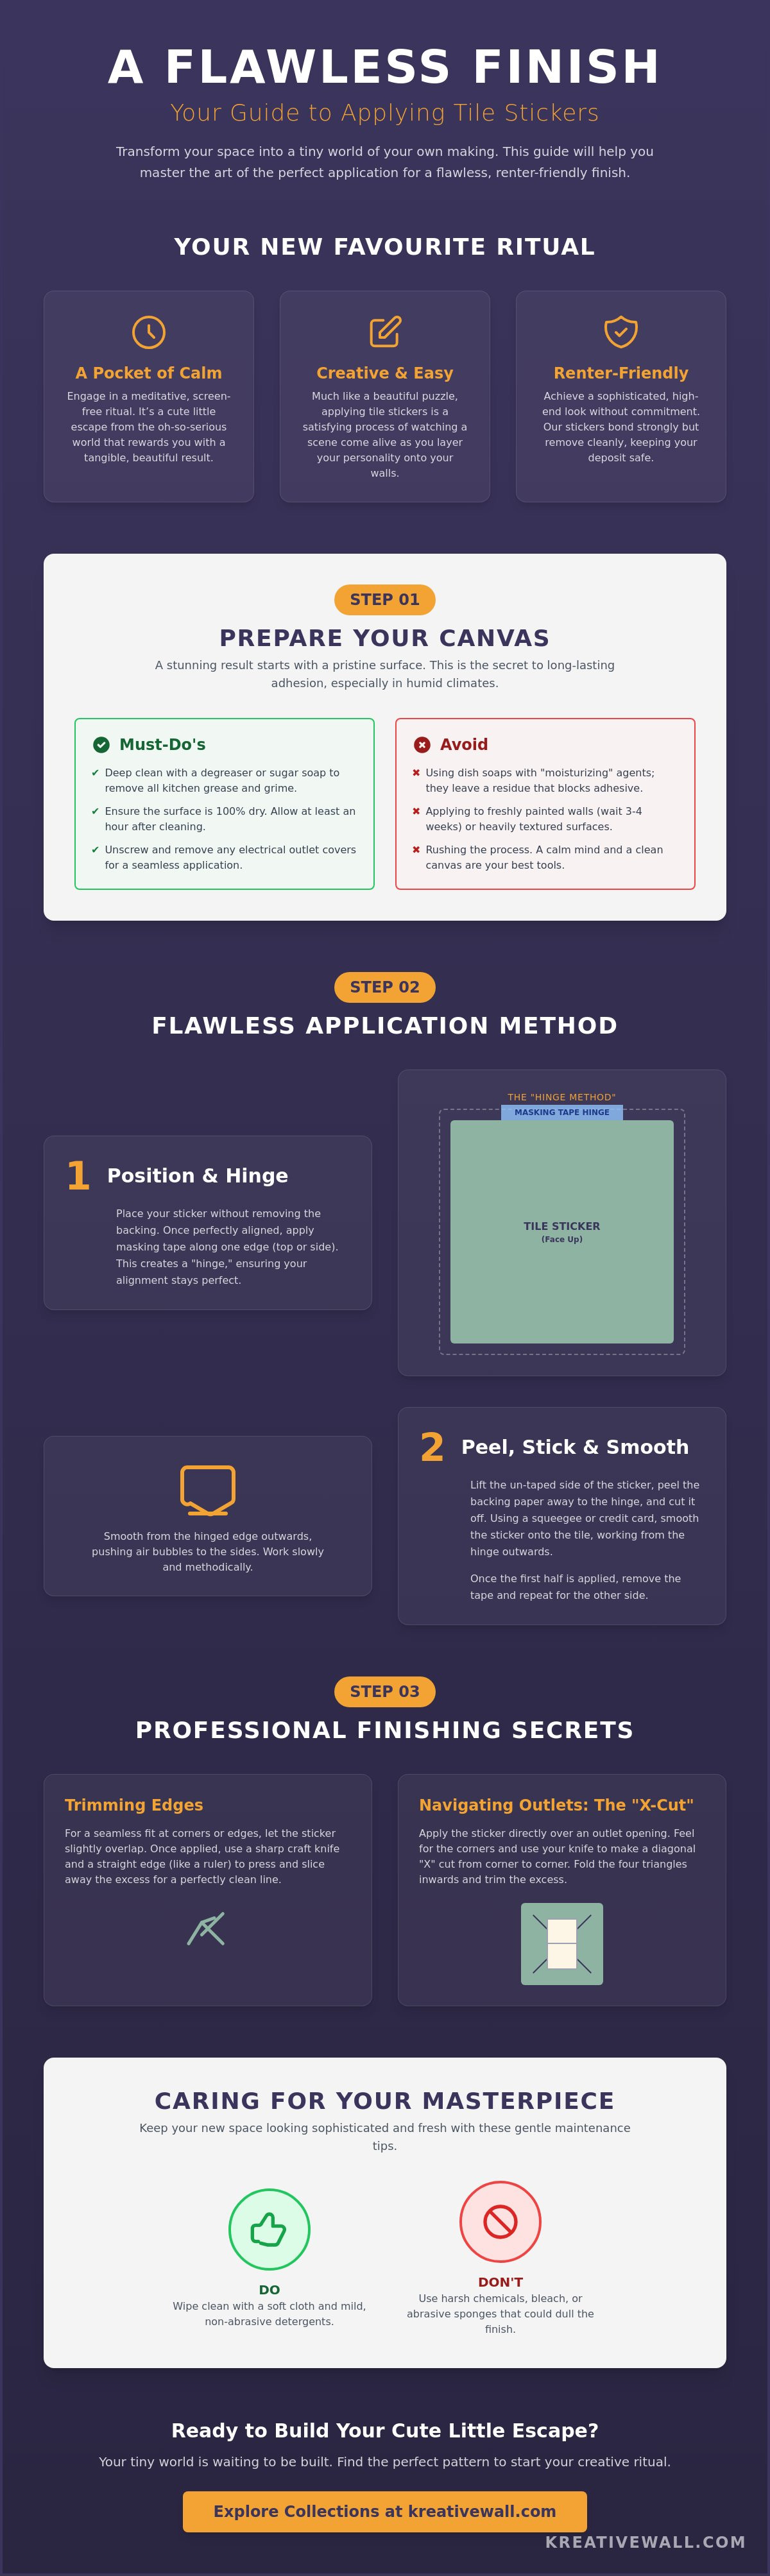
The "Hinge Method" is our favorite way to keep the process stress-free and professional. Secure the top of your sticker with a small piece of painter's tape to create a temporary hinge against the wall. This allows you to check the alignment and pattern flow without committing the adhesive too early. Once you're happy with the placement, peel away the backing slowly while smoothing the sticker down from the center outward. Using a soft cloth or a felt-edged squeegee helps chase away air bubbles, creating your little pocket of calm as every piece finds its home.
You'll also need to decide between an overlap or a butt-joint. For most patterned designs, a tiny overlap of 1 or 2 millimeters ensures no gaps appear if the wall isn't perfectly square. If you're using solid textures or subway styles, a butt-joint, where the edges just touch, creates a more seamless and sophisticated look. Creative Tip: Don't throw away your offcuts! Small trimmings make wonderful, unique journaling stickers or accents for a personalized gift tag, turning every scrap into part of your "stiker aesthetic" collection.
The Perfect Alignment
Use a spirit level to ensure your first row is perfectly horizontal. Homes aren't always straight, so don't rely on the countertop as a guide. If you encounter "curly corners" due to the tropical humidity, a hair dryer on a low setting will gently soften the vinyl and help it grip. It's a satisfying, puzzle-like process that turns your wall into a work of art, one tile at a time. This is a great way to master how to apply tile stickers while enjoying a screen-free afternoon.
Managing Air Bubbles and Creases
If a stubborn bubble appears, don't panic. Simply use a tiny pin-prick to release the trapped air and smooth the area flat with your thumb. Remember that this is a relaxing "me-time" project, so stay slow and steady to avoid creases. For a deeper look at the installation process in different environments, check out our peel and stick backsplash pillar guide to see how these techniques apply to larger kitchen transformations.
The Finishing Touches: Trimming for a Professional Look
The final step in your creative journey is where the magic truly settles into place. While the initial placement brings the vision to life, the trimming process provides that sophisticated, high-end finish that makes guests ask if you had a professional installation. A sharp craft blade is your absolute best friend during this stage. A dull blade can pull or tear the vinyl, while a fresh, sharp edge glides through the material like a dream. This is the moment to channel your inner stationery expert and embrace the "miniature world-building magic" that turns a simple project into a masterpiece. Precision here ensures your little pocket of calm looks flawless from every angle.
When you are mastering how to apply tile stickers, you will inevitably meet a few tricky corners where the tile meets a cupboard, a floor, or a windowsill. Instead of guessing the cut, press the sticker firmly into the crease with a blunt edge, like a credit card, to create a visible fold line. Use your blade to trim along that line for a crisp, clean edge. It is a slow, rhythmic process that feels more like a relaxing hobby than a house chore. Taking your time here prevents the "oh-so-serious" world from intruding on your beautiful new sanctuary with messy, jagged edges.
Navigating Obstacles: Sockets, Taps, and Pipes
Don't let a stray electrical outlet interrupt your flow. The "X-cut" technique is a game-changer for navigating these obstacles without the need to remove faceplates. Simply apply the sticker loosely over the socket. Gently feel for the four corners of the outlet and use your blade to cut an "X" from corner to corner. This creates four small triangular flaps. You can then trim these flaps away or tuck them neatly behind the edge of the plastic cover. For more complex shapes like curved taps or pipes, try making a paper template first. Trace the shape onto a scrap piece of paper, test the fit, and then use it as a guide for your actual sticker. If you need to make tiny, delicate adjustments, a Scene Sticker Tweezer is the perfect tool for the job, allowing you to lift and reposition edges with total control.
Sealing the Deal: Edge Protection
Our tropical humidity in Singapore and Malaysia means we need to be extra mindful of moisture. For any application in a "wet zone," such as right behind a sink or along a bathtub, creating a waterproof seal is vital for longevity. Once your stickers are perfectly trimmed and pressed down, consider applying a tiny, almost invisible bead of clear silicone along the top edge. This prevents water from seeping behind the adhesive over time, keeping your "stiker aesthetic" looking fresh for years. Make sure to press all the edges down one last time with a soft cloth to ensure a tight bond. For more specific advice on creating a spa-like environment that stands up to steam, dive into our bathroom tile stickers guide. These small, thoughtful steps turn a simple "peel and stick" moment into a durable, stress-relief haven.
Caring for Your New Space: Maintenance and Longevity
Your newly transformed sanctuary is now your very own pocket of calm. Maintaining this "stiker aesthetic" shouldn't feel like a heavy chore; instead, think of it as a simple daily ritual that honours your creative work. Just as you'd care for your favorite Scene Stickers, your tile refresh deserves a gentle touch to keep its colours vibrant and its edges crisp. Now that you've mastered how to apply tile stickers for a professional finish, a few mindful habits will ensure that beauty lasts for years to come. It is about preserving that sense of wonder you felt when you first watched the scene come alive on your walls.
Heat resistance is a common question, especially in busy kitchens across Singapore and Malaysia where the kettle is always on. While high-quality vinyl is quite durable, it's best to keep a small distance between your stickers and direct flames or high-heat hobs. Think of it as protecting your art. If you have a backsplash near a stove, ensure there is a few inches of clearance to prevent the adhesive from softening over time. This small bit of care keeps your "tiny world waiting to be built" looking its absolute best without any stress.
Cleaning Tips for a Lasting Glow
Keep things relaxing and stress-free by using a soft microfibre cloth and a splash of mild soapy water. Avoid those "oh-so-serious" abrasive scrubbers or harsh chemical cleaners; these can dull the sophisticated finish and leave tiny scratches. Think of it as delicately cleaning your precious journaling stickers or fine stationery. In high-use areas like the kitchen sink or bathroom, try to wipe away splashes immediately to prevent mineral buildup or soap scum. If your space gets a lot of direct tropical sunlight, keeping the surface dust-free helps maintain that original, vibrant glow for as long as possible.
Refreshing the Look: When to Change Your Scene
The true magic of this hobby is that it can evolve as you do. Your home is a creative outlet, and sometimes that means updating the scenery to match a new season of life, much like adding new depth with 3D Scene Stickers. If a single sticker gets a rare scratch or you simply want a fresh vibe for the new year, you can easily swap it out without replacing the entire wall. It's a cute little escape from the oh-so-serious world that keeps your home feeling fresh. Explore these renter friendly kitchen backsplash ideas for your next project.
We can't wait to see the sanctuary you build. Our local warehouse support in Singapore, Malaysia, and Indonesia is here to help your vision come to life with ease. Take a little peek at our latest collections today and find the next piece of your dream home.
Your Creative Sanctuary Awaits
Transforming your space is more than a simple DIY project; it is a chance to step away from the digital world and lose yourself in a calming, tactile ritual. By focusing on a pristine canvas and using the clever "Hinge Method" for alignment, you've learned how to apply tile stickers like a professional. From the first satisfying peel to that final, precise trim around a socket, every step brings you closer to a home that truly reflects your unique spirit. It's about finding joy in the small details and watching a "stiker pemandangan" come alive right before your eyes.
Trusted by thousands of "kidults" and home enthusiasts across the globe, our community celebrates the magic of miniature world-building magic. With our dedicated Singapore-based warehouse support and worldwide shipping for creators everywhere, your next transformation is just a few clicks away. Whether you're in Malaysia, Indonesia, or beyond, we're here to help you build your little pocket of calm with ease and confidence.
Ready to start your next "me-time" project? Explore our latest Peel & Stick Backsplash collections and start your creative ritual today! We can't wait to see the beautiful, cute little escape you create in your own home.
Frequently Asked Questions
Can I apply tile stickers over textured or embossed tiles?
You should stick to smooth, flat surfaces for the best result. Textured or embossed tiles create tiny air gaps that prevent the adhesive from forming a full bond. This could lead to your stickers lifting or looking uneven over time. Think of it like a Scene Sticker Book; the magic works best on a flat canvas where every beautiful detail can shine perfectly.
Are tile stickers really waterproof enough for a shower or bathroom?
Yes, high-quality tile stickers are designed to be water-resistant and can easily handle the splashes of a busy bathroom. For areas with direct water contact like a shower, you'll want to ensure the edges are sealed with a tiny bead of silicone. This extra step keeps the humidity from sneaking behind the adhesive, ensuring your little pocket of calm stays beautiful even during a steamy soak.
How long do peel and stick tile stickers typically last?
Most peel and stick solutions can last for several years depending on the environment and how well they were installed. While some premium brands report a lifespan of up to 25 years, the typical home refresh lasts about 5 to 7 years before you might want a change. If you've followed our guide on how to apply tile stickers with proper cleaning, you'll enjoy your creative sanctuary for a very long time.
Will tile stickers damage my original tiles when I remove them?
No, they won't damage your original tiles if the surface is in good condition. These stickers use a pressure-sensitive adhesive that is designed to peel away cleanly when you're ready for a new "stiker aesthetic" look. It makes them the perfect "me-time" project for renters in Singapore or Malaysia. Just use a little heat from a hair dryer during removal to soften the bond and ensure a stress-relief experience.
Can I use tile stickers behind a gas or electric stove?
You can use them behind a stove, but it's important to keep a safe distance from direct flames. We recommend a clearance of at least 15cm from gas hobs to prevent the heat from warping the vinyl. For electric or induction cooktops, they are generally very safe. This allows you to build a tiny world in your kitchen without worrying about the heat of a busy dinner service.
What should I do if my tile stickers start peeling at the corners?
If a corner starts to lift, don't worry. Simply use a hair dryer on a low setting to gently warm the vinyl and reactivate the adhesive. Press it down firmly with a soft cloth for a few seconds. This quick fix is a normal part of maintaining your creative sanctuary, especially in humid climates where the air can sometimes be a bit cheeky and persistent.
Do I need any special tools to apply tile stickers for a professional look?
You don't need a professional kit to achieve a sophisticated finish. A sharp craft blade, a metal ruler, and a soft cloth or squeegee are all you need to master how to apply tile stickers. For those tiny, delicate adjustments, a pair of tweezers can be incredibly helpful. It's a beginner-friendly hobby that doesn't require a trip to the hardware store for expensive heavy machinery.
Can I apply tile stickers over painted walls or just ceramic tiles?
Yes, you can apply them to smooth, painted walls as well as ceramic tiles. Just make sure the paint is fully cured, which usually takes about 3 to 4 weeks for fresh coats. If the wall is heavily textured or has "orange peel" bumps, the stickers might not sit perfectly flat. A smooth, clean wall is the best foundation for your miniature world-building magic to truly take hold.

Article by
Kreative Wall
Kreative Wall is your Scene Sticker and creative stationery specialist, curating joyful Scene Stickers, Landscape Stickers, journaling stickers, scrapbook stickers, and cute decorative finds for creative souls who love tiny worlds, big joy, and a little escape from the oh-so-serious world.